• Sign Up! To view all forums and unlock additional cool features

    Welcome to the #1 Dodge, Jeep and RAM Forum dedicated to FCA owners and enthusiasts. Register for an account, it's free and it's easy, so don't hesitate to join the SRT Forum today!


Looking for advice on clay bar cleaning

OP
2ndAmend

2ndAmend

4000 Posts Club
Premium Account
9 Second Best E/T
HFCOTM
Member ID
#14483
Messages
4,373
Reactions
10,642
Likes
302
City
Seacoast
State
NH
Country
United States
Vehicle
20HCM6 22RENBS2
Thread Starter #21
And why I only use water from my DI system for washing !
I have it in my Amzn "Saved for Later", $460.. Hard decision for someone cheap like me! Won't the ceramic stop the water spots?


Speedy!

Infomercial Producer
Staff Team
Founding Member
U.S. Marine Veteran
9 Second Best E/T
HFCOTM & HFCOTY
Member ID
#1070
Messages
7,378
Reactions
19,352
Likes
402
City
Interwebs
State
TN
Country
United States
Vehicle
Demon 170
#22
Ceramic coating helps but does not eliminate hard water spots. I use my CR Spotless every time I wash our cars. Resin lasts about 4 years so well worth the investment.


OP
2ndAmend

2ndAmend

4000 Posts Club
Premium Account
9 Second Best E/T
HFCOTM
Member ID
#14483
Messages
4,373
Reactions
10,642
Likes
302
City
Seacoast
State
NH
Country
United States
Vehicle
20HCM6 22RENBS2
Thread Starter #23

MikeD1

4000 Posts Club
Founding Member
Premium Account
HFCOTM
Member ID
#1026
Messages
4,731
Reactions
19,070
Likes
302
City
Central Florida
State
FL
Country
United States
Vehicle
2016 Challenger Hellcat
HFCOTM
View Images
#24
That's the one ! I have seen it for a bit less at Costco from time to time.

How long the resin lasts depends on how hard your water is & how you use it.
DO NOT just use a hose & regular nozzle - uses gobs of water (and thus resin). Get one of those cheap electric pressure washers (with low pressure), use the widest spray nozzle and 'sweep' the car from a distance. Be especially careful around stripes, seams, door edges etc. the idea is to wet the car, wash, then gently rinse it away. You can hit the wheels a bit harder than the body, but not too hard.

Supposedly you can just walk away, but my OCD prohibits that & I use a leaf blower to blow most of the water beads (and all the cracks & crevices) off followed by a large MF towel to get every last drop ;) + another 'old' MF towel for the door jambs, underhood etc.

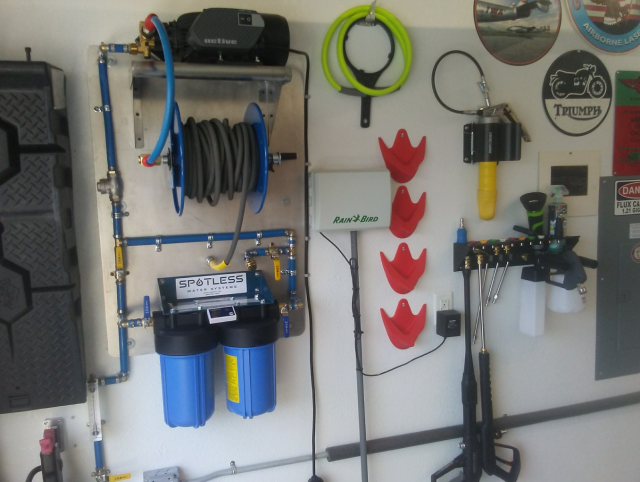
Lastly, you can buy replacement cartridges & bulk resin from them, but since like me you are a tightwad, you can replace it yourself & reuse the cartridges indefinitely. Just unscrew them from the unit & let them drain for a while, then unscrew & dump the resin in a HD large trash bag. It is wet & heavy + the beads are VERY slippery so be careful not to spill. Then wash & rinse the cartridges, carefully fill with the bulk resin, put a dab of lithium grease on each of the big O rings & screw it all together.

Bulk resin is available from most commercial window washers stores/websites. BTW you can use this set-up with a bucket of soapy water (I actually use my car soap) & a soft brush on an extension pole to wash you outside house windows !! Those I let air dry & they turn out good with little hassle.

Example of bulk resin:

https://jracenstein.com/resin-di-cubic-foot-new-virgin-resin/


Member ID
#1517
Messages
209
Reactions
542
Likes
67
City
S
State
CT
Country
United States
Vehicle
2016 Challenger Hellcat
#25
1). Do NOT hire a pro. You can do this. 2). The best part about clay bar is, ya can't hurt anything. It's clay. It won't do damage. 3) Do just one panel at a time. When it's smooth, you're done. Move to the next panel. 4) When you're finished, you'll wonder why you never used clay bar before.


Member ID
#27285
Messages
51
Reactions
84
Likes
17
City
Croydon
State
PA
Country
United States
Vehicle
2021 SRT 392 Durango
#26
Using a clay bar for the first time.
Well that's fine but I suggest you watch a bunch of YouTube videos on this subject before you tackle this job. I don't recall what color paint you have but clay bars can mar the paint especially if you don't lubicrate properly. Most will suggest a clay lube spray, I don't support that move. The best thing to use is a strip wash soap like Hyperclean Cleanse, Adam's Polishes Strip wash etc. They recommend 2 to 4 ounces of soap in a bucket, I'd go at least 4 ounces or even 6 to give you max lube when claying. Wash the entire vehicle , rinse off then heavy soap each panel and clay away. Even light pressure is all you need. Don't over due it and feel with your fingers each panel before and after clay. Rinse each panel as you go around and do it in the shade, do not do this in direct sunlight or you will have issues.


MikeD1

4000 Posts Club
Founding Member
Premium Account
HFCOTM
Member ID
#1026
Messages
4,731
Reactions
19,070
Likes
302
City
Central Florida
State
FL
Country
United States
Vehicle
2016 Challenger Hellcat
HFCOTM
View Images
#27
1). Do NOT hire a pro. You can do this. 2). The best part about clay bar is, ya can't hurt anything. It's clay. It won't do damage. 3) Do just one panel at a time. When it's smooth, you're done. Move to the next panel. 4) When you're finished, you'll wonder why you never used clay bar before.
That's not entirely true, you can mar the finish if you let the clay get too dirty, press too hard or don't use enough lube (you can never have too much lube ;)). Also, if you drop the bar - it's trash DO NOT try to clean it off & reuse !!!!


DGatzby

8000 Posts Club
Founding Member
Premium Account
U.S. Air Force Veteran
Donating Member
HFCOTM & HFCOTY
Member ID
#797
Messages
8,798
Reactions
53,748
Likes
402
City
SW Twin Cities
State
MN
Country
United States
Vehicle
2019 Dodge Challenger Redeye WB
#28
I have clayed dozens of times, I have never considered it so complicated and difficult as per some of the above apparent instructions. As long as it is swirling around on liquid and you maintain a soft touch and never drag debris, correcting polish is the next step. Life is good, have fun with it!!


MikeD1

4000 Posts Club
Founding Member
Premium Account
HFCOTM
Member ID
#1026
Messages
4,731
Reactions
19,070
Likes
302
City
Central Florida
State
FL
Country
United States
Vehicle
2016 Challenger Hellcat
HFCOTM
View Images
#29
It's like everything else, once you've done it a few times & you have a 'feel' for it, it's simple & you can do it without really thinking about each step ;)


Speedy!

Infomercial Producer
Staff Team
Founding Member
U.S. Marine Veteran
9 Second Best E/T
HFCOTM & HFCOTY
Member ID
#1070
Messages
7,378
Reactions
19,352
Likes
402
City
Interwebs
State
TN
Country
United States
Vehicle
Demon 170
#30
If I were buying a deionized car wash filter today, I'd be looking at this one:
https://amzn.to/4jJQLRY

It's a bit more money but has a built in "bypass" so you can easily flip a switch and not use up resin un-necessarily.


45-70govt

1000 Posts Club
Founding Member
HFCOTM
Member ID
#991
Messages
1,035
Reactions
4,474
Likes
212
City
Ghetto
State
NM
Country
United States
Vehicle
2017 Challenger Hellcat
#31
Here is the detailing system I built last year. No need to spend the extra money for the bypass DI filter, just build a manifold with a few valves to do the same thing. This wall mount system has been an absolute game changer for me. It was always such a pain to drag out the machine, cords, hoses and so on. Now I just turn on the water supply valve from my water heater manifold, hit power, and I am washing in no time. Mounted everything to a 3/8" aluminum plate so that when I finally move to a place with a real shop I can just unbolt the entire unit and reinstall in the new shop.

Oh, and the red arrow looking things--- Put one in front of each tire and they keep the pressure washer hose from getting stuck under the tire as you go around the car. Wish I knew about them years ago as the hose getting stuck was always annoying.


pw1.png pw2.png


OP
2ndAmend

2ndAmend

4000 Posts Club
Premium Account
9 Second Best E/T
HFCOTM
Member ID
#14483
Messages
4,373
Reactions
10,642
Likes
302
City
Seacoast
State
NH
Country
United States
Vehicle
20HCM6 22RENBS2
Thread Starter #32
Is that the DI-10? What is the difference? Is it just that you need to change the media more frequently"

I like your manifold, I am a DIY'er!

1768779731817.png


45-70govt

1000 Posts Club
Founding Member
HFCOTM
Member ID
#991
Messages
1,035
Reactions
4,474
Likes
212
City
Ghetto
State
NM
Country
United States
Vehicle
2017 Challenger Hellcat
#33

MikeD1

4000 Posts Club
Founding Member
Premium Account
HFCOTM
Member ID
#1026
Messages
4,731
Reactions
19,070
Likes
302
City
Central Florida
State
FL
Country
United States
Vehicle
2016 Challenger Hellcat
HFCOTM
View Images
#34
@45-70govt - that's a sweet setup, wish my garage layout would accommodate something like that ! I always wondered if those wheel chauks worked, will have to snap up a set.

@2ndAmend the only difference is the size of the resin containers + his is a wall mount config. If you plan to bring it in & out you will need the model with a frame & wheels. The system would not survive being left outside in the winter but should be OK in a garage.


BULL

Oh NO! Not that guy!
Staff Team
Founding Member
U.S. Marine Veteran
Donating Member
HFCOTM & HFCOTY
Wiki Contributor
Member ID
#1079
Messages
17,039
Reactions
53,399
Likes
402
City
Weld County
State
CO
Country
United States
Vehicle
MY16 M6 Challenger Hellcat
HFCOTM
View Images
#35
Here is the detailing system I built last year. No need to spend the extra money for the bypass DI filter, just build a manifold with a few valves to do the same thing. This wall mount system has been an absolute game changer for me. It was always such a pain to drag out the machine, cords, hoses and so on. Now I just turn on the water supply valve from my water heater manifold, hit power, and I am washing in no time. Mounted everything to a 3/8" aluminum plate so that when I finally move to a place with a real shop I can just unbolt the entire unit and reinstall in the new shop.

Oh, and the red arrow looking things--- Put one in front of each tire and they keep the pressure washer hose from getting stuck under the tire as you go around the car. Wish I knew about them years ago as the hose getting stuck was always annoying.


View attachment 176503 View attachment 176502


Dude! That's something like I would do! Are you stealing my ideas??

And what's up with the flow meter?


45-70govt

1000 Posts Club
Founding Member
HFCOTM
Member ID
#991
Messages
1,035
Reactions
4,474
Likes
212
City
Ghetto
State
NM
Country
United States
Vehicle
2017 Challenger Hellcat
#36
Dude! That's something like I would do! Are you stealing my ideas??

And what's up with the flow meter?
Flow meter was not really needed, but I had it in my junk pile for years. I added it to verify advertised flow out of the unit, and to give an indication once the pump starts getting tired which should show up as a decrease in flow. If flow ever starts dropping ill order a rebuild kit before the pump grenades itself.

You may also notice the stainless check valve on the supply side. I read something where a guy built a similar system with a cheap pressure washer unit. He also had his water feed coming from the hot water manifold like mine and something went wrong in the unit and it pressurized his hot water heater and burst it. Not sure how that would even work, but he had pics of the damage. Might be a bit OCD but I added it for peace of mind.

100F is the temp limit for my unit. With a tankless water heater its easy to dial in the temp. 100F is not very hot, but it does make a difference when cleaning greasy parts.

If you do build a system get a stubby gun for it. Its so much nicer to use than the old 3' wand type.


Top