• Sign Up! To view all forums and unlock additional cool features

    Welcome to the #1 Dodge, Jeep and RAM Forum dedicated to FCA owners and enthusiasts. Register for an account, it's free and it's easy, so don't hesitate to join the SRT Forum today!


Suspension Control Module CONNECTOR - How to remove and replace?

HWDan

1000 Posts Club
Founding Member
Premium Account
Donating Member
Member ID
#1183
Messages
1,531
Reactions
4,600
Likes
162
City
Home of the Hellcat
State
Non-US
Country
Canada
Vehicle
2017 Charger SRT 392
#21
Looks like you have a tab holding it on the left side that needs releasing or squeezing; slide/pull that up?, circled here, then I take it that its meant to slide to the right and up at a 30 degree or so angle?

connector2.jpg


Last edited:

HWDan

1000 Posts Club
Founding Member
Premium Account
Donating Member
Member ID
#1183
Messages
1,531
Reactions
4,600
Likes
162
City
Home of the Hellcat
State
Non-US
Country
Canada
Vehicle
2017 Charger SRT 392
#22
Comments in the DS video I found says:

"Simple 10 minute install, the module is in the trunk behind the paneling. Remove it, pull the 2 locking tabs for the connectors and remove them. Reverse process to install the new module. "

I assume that means pull "up" the tab I circled in red below?

connector3.jpg


Last edited:

Diboblo

4000 Posts Club
Founding Member
Wiki Contributor
Member ID
#1044
Messages
4,702
Reactions
26,107
Likes
252
City
Riverside
State
CA
Country
United States
Vehicle
2015 Dodge Charger Hellcat!
#23
The manual isn't much help, at all:


MODULE, ACTIVE DAMPING CONTROL (ADCM)
DESCRIPTION
Vehicles equipped with Active Damping Suspension (ADS) have an Active Damping Control Module (ADCM).
The ADCM (3) is located in the left side of the trunk and is retained by four mounting screws (2). The carpet on
the left side of the trunk has to be repositioned to access the ADCM.
OPERATION
The Active Damping Control Module (ADCM) uses the CAN bus to communicate with multiple modules. The
ADCM has the following inputs: Vehicle Speed, Steering Angle Sensor (SAS) position, Throttle Position Sensor
(TPS), Active Damping System (ADS) input switch, and 3 acceleration sensors. There are solenoid-controlled
ADS valving units on each shock absorber assembly which are the outputs for the ADCM.
The ADS input switch is a soft touch button on the radio display. When the ADS input switch is pressed with the
key in the ON or RUN position, a signal is sent over the CAN bus to the ADCM and the Transmission Control
Module (TCM) to change modes. The resulting change is indicated on the radio display.
The Active Damping Control Module (ADCM) controls the suspension and ride for the SRT version of this
vehicle by adjusting the rebound and jounce of the shock assemblies using the above information and
predetermined settings for maximum vehicle control. The shock absorbers are unique to the Active Damping
System (ADS). Each shock absorber has a valving unit that is external, but still part of the shock absorber. Inside
each valving unit are two solenoids that control the damping valves to alter the ride of the vehicle. The shocks are
replaced as an assembly, they cannot be disassembled for repair.
The two front acceleration sensors are mounted with one on each wheel well. The rear acceleration sensor is
mounted in the right rear wheel well on the shock tower. The ADCM is located in the left side of the trunk.
REMOVAL
6/21/2019 MITCHELL 1 ARTICLE - 2017 ACCESSORIES AND EQUIPMENT Electronic Control Modules - Service Information - Challenger
file:///C:/in851750.html 6/124
1. Disconnect and isolate the negative battery cable.
2. Remove the left rear wheel well carpet. Refer to CARPET, REMOVAL .
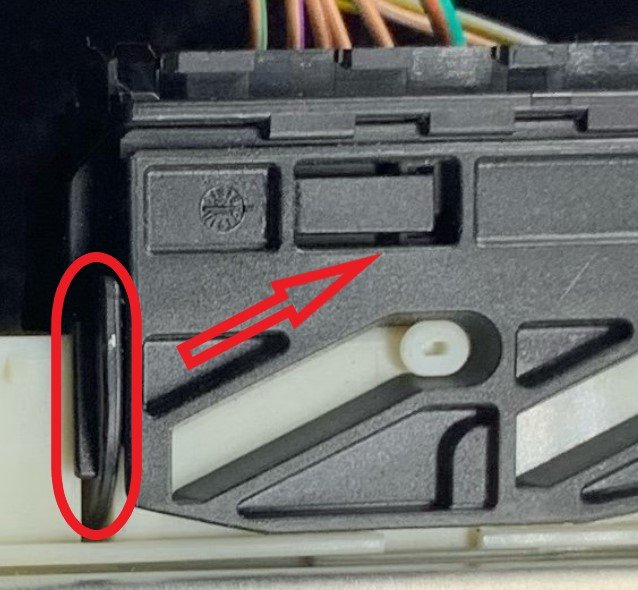
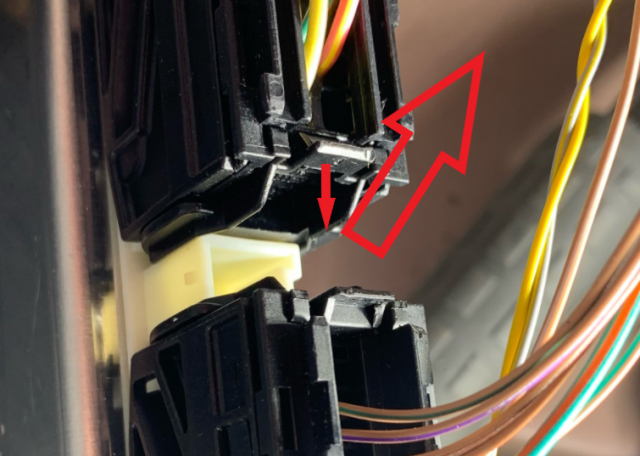
3. Disconnect the two wire harness connectors (1) and remove the three screws (2) from the Adaptive
Damping Control Module (ADCM) (3).
4. Remove the ADCM from the vehicle.
INSTALLATION
1. Place the Active Damping Control Module (ADCM) (3) into position and install the three ADCM retaining
screws (2). Tighten to the proper torque specifications. Refer to TORQUE SPECIFICATIONS.
2. Install the retaining screws (2) and tighten to 9 N.m (80 in. lbs.).
3. Connect the wire harness connectors (1) to the ADCM (3). Install the inner left rear wheel well carpet.
Refer to CARPET, INSTALLATION .
4. Connect the negative battery cable.
5. Perform the ADCM Verification Test.


Attachments

Last edited:

HWDan

1000 Posts Club
Founding Member
Premium Account
Donating Member
Member ID
#1183
Messages
1,531
Reactions
4,600
Likes
162
City
Home of the Hellcat
State
Non-US
Country
Canada
Vehicle
2017 Charger SRT 392
#24
ok how about this, pull the tab in the small red arrow out in that direction, then slide it the lock up. Then the connector slides out?
I take it the retainer has a tab that needs to bend out before it can slide up. Then the connector itself can slide out sideways?

connector5.jpg.png


OP
DGatzby

DGatzby

6000 Posts Club
Founding Member
Premium Account
U.S. Air Force Veteran
Donating Member
HFCOTM & HFCOTY
Member ID
#797
Messages
6,693
Reactions
42,593
Likes
402
City
SW Twin Cities
State
MN
Country
United States
Vehicle
2019 Dodge Challenger Redeye WB
Thread Starter #25
OP
DGatzby

DGatzby

6000 Posts Club
Founding Member
Premium Account
U.S. Air Force Veteran
Donating Member
HFCOTM & HFCOTY
Member ID
#797
Messages
6,693
Reactions
42,593
Likes
402
City
SW Twin Cities
State
MN
Country
United States
Vehicle
2019 Dodge Challenger Redeye WB
Thread Starter #26
ok how about this, pull the tab in the small red arrow out in that direction, then slide it the lock up. Then the connector slides out?
I take it the retainer has a tab that needs to bend out before it can slide up. Then the connector itself can slide out sideways?

View attachment 36372
It has to be like that. I’ll see what they show in the video tomorrow.


Paladin06

4000 Posts Club
Founding Member
Premium Account
U.S. Army Veteran
Donating Member
HFCOTM
Member ID
#1080
Messages
4,662
Reactions
24,172
Likes
302
City
Clarksville
State
TN
Country
United States
Vehicle
2015 Challenger Hellcat/2019 Challenger Redeye
#27
I am promised a video tomorrow. You can all share the wall of shame with me, as he said it is easy. When I get it installed I’ll do a good write up and pictures so we can wiki it here. I already have a suggestion to add for everyone before you put it away, that will be unique to our house.

All right, time to start other stuff on the girl including finding the remnants of raccoon #2. HCOTY is getting hoisted up!
Any word on the video? I’m so ready to pull the trigger.


OP
DGatzby

DGatzby

6000 Posts Club
Founding Member
Premium Account
U.S. Air Force Veteran
Donating Member
HFCOTM & HFCOTY
Member ID
#797
Messages
6,693
Reactions
42,593
Likes
402
City
SW Twin Cities
State
MN
Country
United States
Vehicle
2019 Dodge Challenger Redeye WB
Thread Starter #28
@Paladin06 it is easy. It is done by moving the BOTTOM of the assembly to the side, not the top. At that point it releases very easy and clips in even more easy!

I also hooked her back up, started it, flipped through the SRT Screens. All is absolutely normal looking. It never even knew we replaced the left side of its brains! Can’t wait to try it out.
D0287B61-6C44-4DD7-82DD-A296E356F548.jpeg


Paladin06

4000 Posts Club
Founding Member
Premium Account
U.S. Army Veteran
Donating Member
HFCOTM
Member ID
#1080
Messages
4,662
Reactions
24,172
Likes
302
City
Clarksville
State
TN
Country
United States
Vehicle
2015 Challenger Hellcat/2019 Challenger Redeye
#29
@Paladin06 it is easy. It is done by moving the BOTTOM of the assembly to the side, not the top. At that point it releases very easy and clips in even more easy!

I also hooked her back up, started it, flipped through the SRT Screens. All is absolutely normal looking. It never even knew we replaced the left side of its brains! Can’t wait to try it out.
View attachment 36426
I’m sorry, the bottom to the side and not the top?


Last edited:

BULL

Oh NO! Not that guy!
Staff Team
Founding Member
U.S. Marine Veteran
Donating Member
HFCOTM
Wiki Contributor
Member ID
#1079
Messages
14,585
Reactions
44,735
Likes
402
City
Weld County
State
CO
Country
United States
Vehicle
MY16 M6 Challenger Hellcat
HFCOTM
View Images
#30
@Paladin06 it is easy. It is done by moving the BOTTOM of the assembly to the side, not the top. At that point it releases very easy and clips in even more easy!

I also hooked her back up, started it, flipped through the SRT Screens. All is absolutely normal looking. It never even knew we replaced the left side of its brains! Can’t wait to try it out.
View attachment 36426


Hey hey hey!!!! You're not getting away that easy!


We need 8 x 10 glossy pictures with circles and arrows and a paragraph on the back!


Slowpoke387

2000 Posts Club
Founding Member
Donating Member
HFCOTM
Member ID
#969
Messages
2,271
Reactions
5,315
Likes
302
City
Somewhere
State
CT
Country
United States
Vehicle
2020 Challenger Hellcat Redeye WB
#31
Hey hey hey!!!! You're not getting away that easy!


We need 8 x 10 glossy pictures with circles and arrows and a paragraph on the back!
Agreed! Cmon we were all brainstorming for ya - get to splainin with pie charts, videos, pics, graphs, all of it.


moparjim

1000 Posts Club
Founding Member
10 Second Best E/T
HFCOTM
Member ID
#1084
Messages
1,731
Reactions
4,306
Likes
212
City
Vaudreuil
State
Non-US
Country
Canada
Vehicle
2016 Challenger Hellcat
#32
@Paladin06

I also hooked her back up, started it, flipped through the SRT Screens. All is absolutely normal looking. It never even knew we replaced the left side of its brains! Can’t wait to try it out.
View attachment 36426
So how do you change how the shocks work if the screen is the same?🤔
We need to know how this works!! 🤪
Can you change settings from the screen besides what we already have.


Magnified

Poster Club Hall of Fame
Founding Member
Member ID
#1155
Messages
11,710
Reactions
19,827
Likes
352
City
West Texas
State
TX
Country
United States
Vehicle
2017 Charger HC (once upon a time)
#33
The box does what it wants, all the time, taking the commanded "mode" as a basic starting point.


OP
DGatzby

DGatzby

6000 Posts Club
Founding Member
Premium Account
U.S. Air Force Veteran
Donating Member
HFCOTM & HFCOTY
Member ID
#797
Messages
6,693
Reactions
42,593
Likes
402
City
SW Twin Cities
State
MN
Country
United States
Vehicle
2019 Dodge Challenger Redeye WB
Thread Starter #34
Wow. Yes, slide the bottom of the connector to the side. Go disconnect your battery and try it! Snaps back on even more easy.

Seriously, there is nothing to do as I understand it. It gave no messages (good), and the screens are as they were and not changed (as expected).

I believe you can screw with it by computer, but I am probably not doing that part.

So far, now that we know about the connector, yes, it is easy to install.


OP
DGatzby

DGatzby

6000 Posts Club
Founding Member
Premium Account
U.S. Air Force Veteran
Donating Member
HFCOTM & HFCOTY
Member ID
#797
Messages
6,693
Reactions
42,593
Likes
402
City
SW Twin Cities
State
MN
Country
United States
Vehicle
2019 Dodge Challenger Redeye WB
Thread Starter #35
So how do you change how the shocks work if the screen is the same?🤔
We need to know how this works!! 🤪
Can you change settings from the screen besides what we already have.
Jim, it is built in to enhance the launch, it is all programmed in for us.


Magnified

Poster Club Hall of Fame
Founding Member
Member ID
#1155
Messages
11,710
Reactions
19,827
Likes
352
City
West Texas
State
TX
Country
United States
Vehicle
2017 Charger HC (once upon a time)
#36
lol can't wait for the test.. I mean cant wait


OP
DGatzby

DGatzby

6000 Posts Club
Founding Member
Premium Account
U.S. Air Force Veteran
Donating Member
HFCOTM & HFCOTY
Member ID
#797
Messages
6,693
Reactions
42,593
Likes
402
City
SW Twin Cities
State
MN
Country
United States
Vehicle
2019 Dodge Challenger Redeye WB
Thread Starter #37
lol can't wait for the test.. I mean cant wait
Ha, me either. Maybe even go cheat a few miles if the streets get dry:D


moparjim

1000 Posts Club
Founding Member
10 Second Best E/T
HFCOTM
Member ID
#1084
Messages
1,731
Reactions
4,306
Likes
212
City
Vaudreuil
State
Non-US
Country
Canada
Vehicle
2016 Challenger Hellcat
#38
Jim, it is built in to enhance the launch, it is all programmed in for us.
Interesting. I misunderstood the add on FB.
I thought we could adjust it. Something about being able to adjust each shock individually.
Still looking forward to hearing what you think about it.


Hpindy

4000 Posts Club
Founding Member
9 Second Best E/T
HFCOTM
Member ID
#974
Messages
4,869
Reactions
11,001
Likes
302
City
Jackson's Point
State
Non-US
Country
Canada
Vehicle
2018 challenger hellcat
#39
Interesting. I misunderstood the add on FB.
I thought we could adjust it. Something about being able to adjust each shock individually.
Still looking forward to hearing what you think about it.
I emailed Diablo sport and asked if it was programmable . I'm still waiting for a reply .

Sent from my BBF100-2 using Tapatalk


OP
DGatzby

DGatzby

6000 Posts Club
Founding Member
Premium Account
U.S. Air Force Veteran
Donating Member
HFCOTM & HFCOTY
Member ID
#797
Messages
6,693
Reactions
42,593
Likes
402
City
SW Twin Cities
State
MN
Country
United States
Vehicle
2019 Dodge Challenger Redeye WB
Thread Starter #40
I emailed Diablo sport and asked if it was programmable . I'm still waiting for a reply .

Sent from my BBF100-2 using Tapatalk
As I understand it, you can, but the canned programming has been shown to work. After watching some videos, the thing you guys may want to change is the milliseconds it controls the shocks during the launch.


Top